Web Application Firewall (ModSecurity)
summary
In this topic, you will learn how to protect your web applications (such as WordPress, Joomla!, or Drupal) from attacks using ModSecurity, an Open Source web application firewall.
The topic gives a short overview of the way ModSecurity works, and also explains how to enable and configure it.
In order to detect and prevent attacks against web applications, the web application firewall (ModSecurity) checks all requests to your web server and related responses from the server against its set of rules. If the check succeeds, the HTTP request is passed to website to retrieve the content. If the check fails, the predefined actions are performed.
ModSecurity is supported in both Plesk for Linux and for Windows. It works as a web server (Apache, Nginx, or IIS) module.
Turning on ModSecurity
To turn on the web application firewall:
Go to Tools & Settings > Web Application Firewall (ModSecurity) (under “Security”).
If you do not see this link, install the ModSecurity component in Tools & Settings > Updates > Add/Remove Components > Web hosting group.
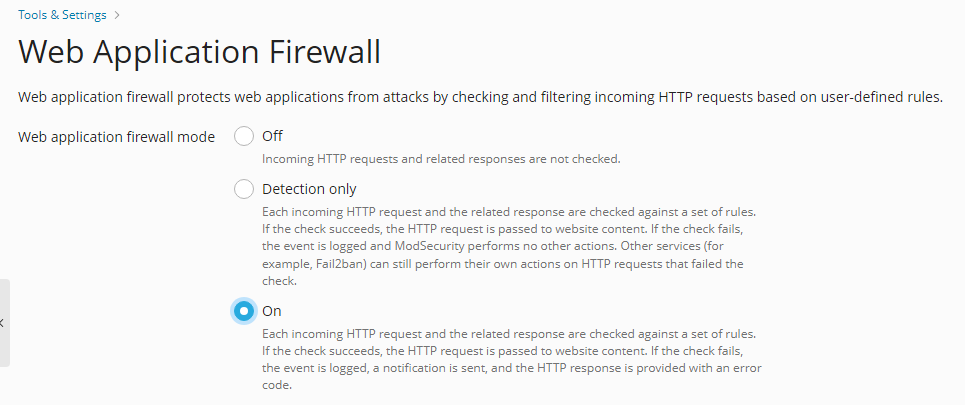
Set the web application firewall mode to On or Detection only. Each incoming HTTP request and the related response will be checked against a set of rules. If the check succeeds, the HTTP request will be passed to web site to retrieve the content. If the check fails, the event will be logged. In the Detection only mode, no other actions will be performed. In the On mode, the HTTP response will be provided with an error code.
Note
The web application firewall modes can be set on the server and domain levels. However, the domain level mode cannot be higher than the mode set for the server. For example, if the web application firewall is working in Detection only mode on the server level, you will not be able to turn it to On for domains. Only Off and Detection only modes will be shown.
(Plesk for Linux only) Go to the “Settings” tab, and then select the desired ModSecurity version from the Run rules on drop-down menu:
- Apache (ModSecurity 2.9) (recommended). ModSecurity 2.9 only works for domains with “Proxy mode” enabled in Apache & nginx Settings.
- Nginx (ModSecurity 3.0). ModSecurity 3.0 can only use rule sets from OWASP and Comodo. We strongly recommend trying ModSecurity 3.0 on a test server before using it in your production environment.
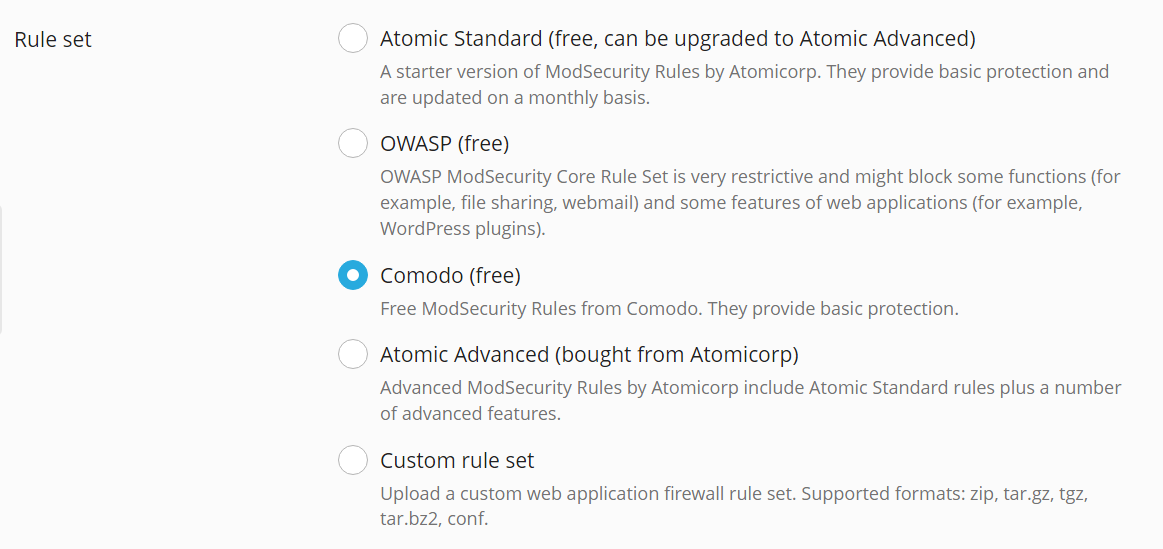
Select an available set of rules that will be checked by the web application firewall engine for each incoming HTTP request, or upload a custom rule set. You can select the following rule sets:
Atomic Standard (free, can be upgraded to Atomic Advanced). A free starter version of the Atomic ModSecurity rules, bundled with Plesk. It contains important security features and bug fixes released on a monthly basis. For rules included in this rule set, see Atomic ModSecurity Rule Sets.
OWASP (free). The OWASP ModSecurity Core Rule Set (CRS) provides generic protection from unknown vulnerabilities often found in web applications. This rule set is shipped for free. It is known as a very restrictive rule set; it requires additional tuning for production use. When this rule set is selected, WordPress partly does not work, webmail and file sharing do not work either. You can use Atomic or Comodo rule sets instead.
(Plesk for Linux) Comodo (free). A free, simple-to-use, customizable, rules-based traffic control system that protects your web-based applications and prevents newly emerging hacking techniques with the use of a frequently updated rules database.
Atomic Advanced. The latest version of the rules, with all the performance enhancements, new security features and bug fixes released by Atomicorp GotRoot on a daily basis. This is a commercial rule set that is fully supported and recommended for production use. Plesk provides the Security Core Complete by Atomicorp extra feature that allows you to enable this rule set in Plesk. You can get this extra feature by the following ways:
- Buy the Advanced ModSecurity Rules by Atomicorp product in the Plesk Online store.
- If you already have a Plesk license, you can add the extra feature via the Plesk Partner Central UI or via the Partner API (for details, refer to the Partner Central User’s Guide or Partner API 3.0 reference).
- If you have a Plesk license but have no access to the Plesk Partner Central, contact your provider.
If you already have an account on the Atomic site, you can provide your username and password to enable this rules set.
Note
If you get this extra feature, the Plesk interface will display Atomic Advanced instead of Atomic Standard (free, can be upgraded to Atomic Advanced), and this actually means the complete Atomic Advanced ModSecurity rule set.
For rules included in this rule set, see Atomic ModSecurity Rule Sets.
Custom rule set. You can upload a custom web application firewall rule set, for example, a trial package from Atomic or a free package from Comodo. Supported formats: zip, tar.gz, tgz, tar.bz2, conf.
To automatically update the selected rule set, select the Update rule set checkbox and select the update period.
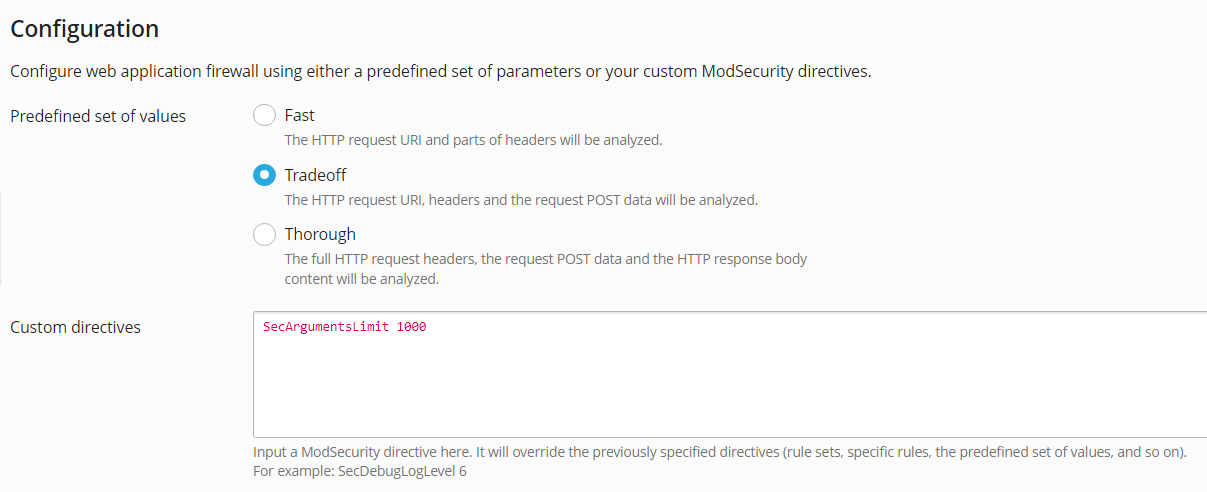
Select a predefined set of parameters or specify your custom ModSecurity directives. You can select the following predefined sets of parameters:
Fast, when the HTTP request URI and parts of headers are analyzed. This mode is the least CPU consuming.
Tradeoff, when the HTTP request URI, headers and the request POST data are analyzed. This mode is a good balance between quality and performance.
Thorough, when the full HTTP request headers, the request POST data and the HTTP response body content are analyzed. This mode consumes the most CPU resources, but it can be recommended for sites that require special security measures. For example, online shops accepting card payments.
Note
For optimal performance, the web application firewall requires a local DNS server with request caching enabled. Otherwise, your websites may load slowly while the web application firewall is turned on.
Log Files (Linux)
On Linux, ModSecurity uses two locations for logs:
- ModSecurity audit log (located in
/var/log/modsec_audit.log) is very detailed and it is used by the whole Plesk server. When ModSecurity detects that an event has occurred, it generates an entry in the audit log file. To view the ModSecurity audit log, go to Tools & Settings > Web Application Firewall (ModSecurity) > click the Logs Archive link in the ModSecurity audit log section. Here you can view the ModSecurity log files and their modification dates, and download the log files. - The Apache error log for a domain (located in
/var/www/vhosts/DOMAIN.TLD/logs/error_log) contains only brief information about website errors. You can view the error log for a particular website in the Customer Panel on the Websites & Domains > <domain_name> > Logs > select only Apache error and nginx error instead of All logs on the right.
Log Files (Windows)
On Windows, ModSecurity audit logs are domain-specific and located in
%plesk_dir%ModSecurity\vhosts\<domain's GUID>\logs (where
%plesk_dir% is the default installation directory for Plesk).
Switching off Rules
A website can stop functioning as expected after you change the web
application firewall mode to On from Off or Detection only.
In the website error log, you can find such error codes as 403,
404, or 500, and they stop appearing after you change the web
application firewall mode back to Detection only or Off. In this
case, analyze the ModSecurity audit log to find out what is happening.
You can switch off too excessively restrictive security rules or adjust
the website.
To find out why an HTTP request cannot be completed for a website:
View the audit log file for the website.
In Plesk for Linux, you can use the Plesk’s UI to view the log: go to Tools & Settings > Web Application Firewall (ModSecurity) and click the ModSecurity Log File link to download the audit log and open it in a new browser window.
Use Search (
Ctrl+Fin most web browsers) to find events for the website (the domain name) that have caused problems. For example,your_domain.tld. The browser will highlight entries likeHOST: your_domain.tld. In the three lines above the highlighted entry, find a string like--eece5138-B--. The eight symbols between the hyphens (in our example,eece5138) are the ID of the event triggered by the HTTP request.Search further for other entries with the same event ID. Look for an entry with the letter
Hafter the event ID (in our example,eece5138-H--). This entry contains the ID and description of the security rule triggered while checking the HTTP request. The security rule ID is an integer number in quotation marks with the prefixidin square brackets (for example,[id "340003"]or[id "913102"]).Find a security rule ID in the event using the substring (for example,
[id "3). This ID can be used when you switch off rules.
To switch off a rule:
- Go to Tools & Settings > Web Application Firewall (ModSecurity).
- In the Switch off security rules section, select the security
rule by its ID (for example,
340003), by a tag (for example, CVE-2011-4898), or by a regular expression (for example,XSS) and click OK.


