2. Access Your Mailbox
There are two ways to access a mailbox for sending and receiving email messages:
- Use a web browser to connect to the webmail interface.
- Set up and use an email client program on your computer.
Setting up Email Clients
Plesk can automatically set up certain email clients (for example, Microsoft Office Outlook, Mozilla Thunderbird, and others). This feature is called mail autodiscover. It automatically configures necessary settings (mail protocols, mail servers, ports, and so on) and you do not need to specify them manually. However, not all domain configurations support mail autodiscover.
If your domain does not support mail autodiscover or you want to use mail clients other than Microsoft Office Outlook and Mozilla Thunderbird, set up an email client manually. Typically, you will need to specify the following settings:
- Username. In this field, specify your full email address. For example, johndoe@example.com.
- Password. Most likely, the password to your email account.
- Mail server protocol. This property defines whether you want to keep copies of messages on the server or not. To keep the copies on the server, select the IMAP option. If you do not want to keep them on the server, select POP3. Selecting IMAP will also allow you to train the SpamAssassin spam filter on email messages you receive, if SpamAssassin is enabled on the server.
- Incoming mail server (POP3/IMAP). Type your domain name. For example, example.com. The POP3 port is 110. The IMAP port is 143.
- Outgoing mail server (SMTP). Type your domain name. For example, example.com. The SMTP port is 25. This server requires authentication.
To see the settings necessary for setting up an email client,
go to Websites & Domains > the domain whose email you want to access via an email client > Mail Accounts > the  icon.
If the default mail settings shown in the “Manual Setup” section do not suit your customers, you can edit the text of the section.
To get detailed instructions on configuring popular email clients to work with your mailbox, see subsections of this section.
Editing the Email Client Setup Settings
To help your customers set up an email client manually,
the “Manual Setup” section (Websites & Domains > the domain > Mail Accounts > the  icon)
shows the information about the necessary settings. You can change this information by editing the panel.ini file
which is useful in the following cases:
- Your mail server is secured with an SSL/TLS certificate
(for example, assigned to
server.com) and you do not want your customers to see the “Untrusted certificate” error when they access their mail via an email client. To achieve this, you need to change the incoming and outgoing mail servers shown in “Manual Setup” toserver.com. Then the customers will also specifyserver.comin their mail client settings instead of their domain names. - You want to explicitly specify which ports the customers need to use in their mail client settings.
- You want your customers to use only secure protocols (POP3, IMAP, and SMTP over SSL/TLS).
- You want to hide the note about the “Untrusted certificate” error. By default, this note is shown when the corresponding SSL/TLS certificate is self-signed, expired, or the domain name in the SSL/TLS certificate does not match the incoming mail server name.
- You have any other mail settings that differ from default ones shown in the “Manual Setup” section.
To edit the email client setup settings:
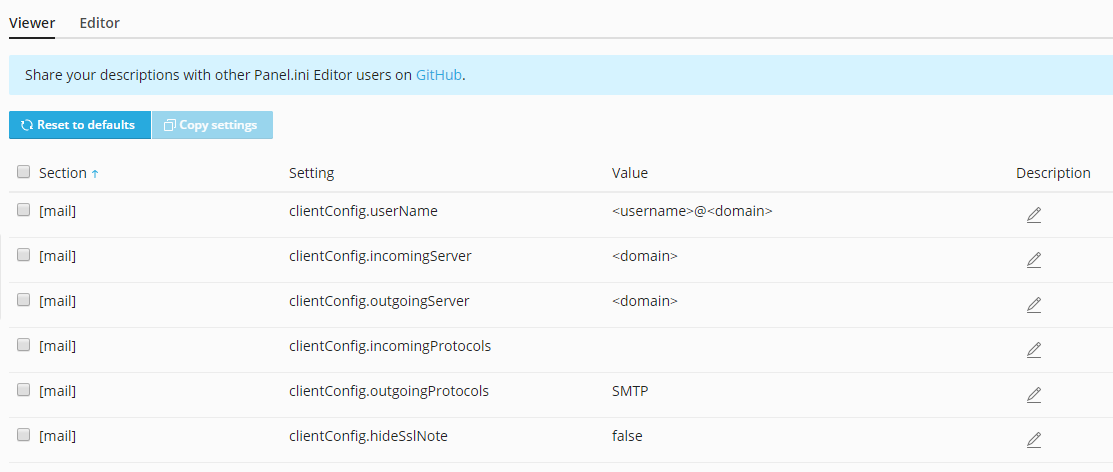
Edit the values of the clientConfig* settings (under the [mail] section) in the panel.ini file.
The full list of all these settings with their default values is shown on the screenshot below:
To change the clientConfig.userName, clientConfig.incomingServer, and clientConfig.outgoingServer settings,
use the <domain>, <user>, and <hostname> placeholders.
To change clientConfig.incomingProtocols and clientConfig.outgoingProtocols use plain text.
For example, you want your customers to use the server hostname as the mail server, to use only secure protocols, and do not want the customers to see the note about the “Untrusted certificate” error in the “Manual Setup” section.
To achieve this, add the following lines to the panel.ini file:
[mail]
clientConfig.incomingServer="<hostname>"
clientConfig.outgoingServer="<hostname>"
clientConfig.incomingProtocols="POP3 over SSL/TLS, IMAP over SSL/TLS"
clientConfig.outgoingProtocols="SMTP over SSL/TLS"
Known Issues and Limitations of Mail Autodiscover
Mail autodiscover does not work for:
- Microsoft Outlook 2019 and Microsoft Outlook 365 mail clients.
- Domains that do not have web hosting.
In some cases, mail autodiscover does not work for domains with SSL (HTTPS) enabled:
Domains are not secured with valid SSL/TLS certificates (for example, self-signed ones). To enable mail autodiscover via HTTPS, secure your domain and the mail server with a paid SSL/TLS certificate from a trusted certificate authority or with a free certificate from Let’s Encrypt. To secure the mail server, go to Websites & Domains > your domain > Mail > the “Mail Settings” tab, next to “SSL/TLS certificate for mail”, select the valid SSL/TLS certificate, and then click OK.
Domains have wildcard subdomains (those that have the asterisk prefix
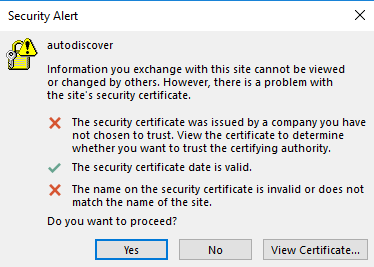
*) in the DNS settings. To enable mail autodiscover via HTTPS for these domains, create a wildcard subdomain in Plesk, get a wildcard SSL/TLS certificate, and secure the following with this certificate: the domain itself, the mail server, and the created wildcard subdomain. To secure the wildcard subdomain, go to its Hosting Settings and choose the wildcard certificate (the one that has the asterisk prefix*). Choosing the wildcard certificate for the wildcard subdomain is necessary because it will otherwise use the self-signed Plesk SSL/TLS certificate by default (even if a wildcard certificate was issued). If you do not choose the wildcard certificate for the wildcard subdomain, you will see a warning message during mail autodiscover. In Microsoft Office Outlook, the message looks like this:
Note
If you cannot access your mailbox following the instructions in this section, this might be caused by mail server settings. For example, the mail server may be secured with an SSL/TLS certificate, making it necessary to use a specific domain name for both incoming and outgoing mail, the mail server may be listening on non-standard ports, access to the ports the mail server is listening on may be blocked, and so on. Contact your hosting provider to resolve the issue.

