(Plesk for Linux) Resistentere Serververbindungen dank DANE
Inhalt
Wenn die Verbindungen zum Mailserver mit einem SSL/TLS-Zertifikat gesichert sind, können Sie sie gegen Downgrade- und Man-in-the-Middle-Angriffe schützen, indem Sie das Netzwerkprotokoll DANE (DNS-based Authentication of Named Entities) aktivieren. DANE schützt auch vor Website-Identitätsdiebstahl, der auf die Kompromittierung von Zertifizierungsstellen zurückzuführen ist.
In this topic, you will learn how to harden connections to the server using DANE: automatically via SSL It! and manually. Note that this topic is not meant to be an exhaustive source of information about DANE or TLSA DNS records.
In Plesk, you can harden connections to the server using DANE in the following ways:
- Automatically by using the SSL It! extension.
- Manually by generating a hash of the SSL/TLS certificate’s public key, and then adding a TLSA DNS record.
Each way has its own advantages as well as downsides.
The automatic implementation of DANE using SSL It! is easy and needs just a few clicks. However, you can harden only one connection type with DANE: to the mail server for an individual domain. Additionally, you can use DANE only with Let’s Encrypt certificates. If you want to use DANE with SSL/TLS certificates of other certificate authorities, choose the manual implementation.
The manual implementation of DANE is a multistep procedure, which requires time and effort (even though we provide you with a step-by-step guide below). As for the benefits, you can harden connections not only to the mail server but also other ones secured with SSL/TLS certificates. You can also use DANE with SSL/TLS certificates of any certificate authorities, not limited to Let’s Encrypt only.
Regardless of the way you choose, you will need to make sure your server and/or hosted domains meet certain requirements necessary for using DANE.
(Automatically) Hardening Mail Connections Using DANE
Before you can automatically harden a connection to the mail server using DANE, make sure your server and hosted domains have the following configuration:
- For the Plesk server:
- The mail service is enabled.
- DKIM is enabled.
- Plesk is the primary DNS server.
- For the domain whose connection to the mail server you want to harden using DANE:
- The mail service is enabled.
- DKIM is enabled.
- The MX record exists and it resolves to the IP address of the Plesk server.
- DNSSEC is enabled.
If all the conditions above are fulfilled, you can harden a connection to the mail server using DANE with the help of the SSL It! extension.
Hardening a Mail Connection Using DANE via SSL It!
Gehen Sie zu Websites & Domains und suchen Sie die entsprechende Domain.
Klicken Sie auf SSL/TLS-Zertifikate.
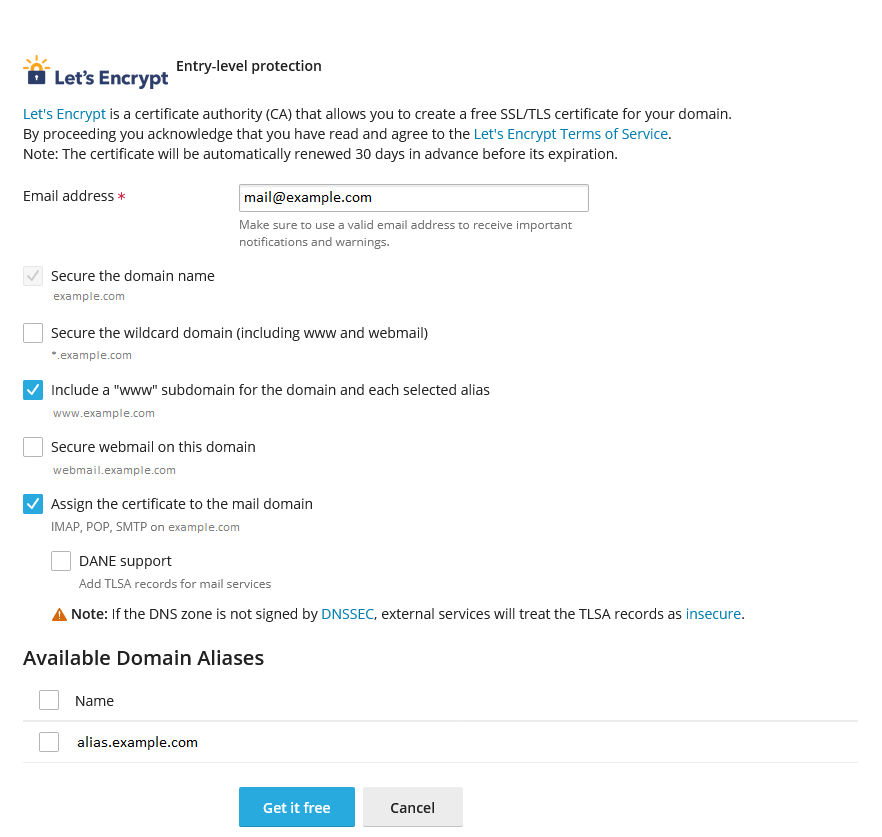
Under „Install a free basic certificate provided by Let’s Encrypt“, click Install.
Keep the „Secure the domain name“ checkbox selected.
(Optional) Select other checkboxes depending on subdomains you want to secure.
Select the „Assign the certificate to the mail domain“ and „DANE support“ checkboxes.
Klicken Sie auf Kostenlos nutzen.
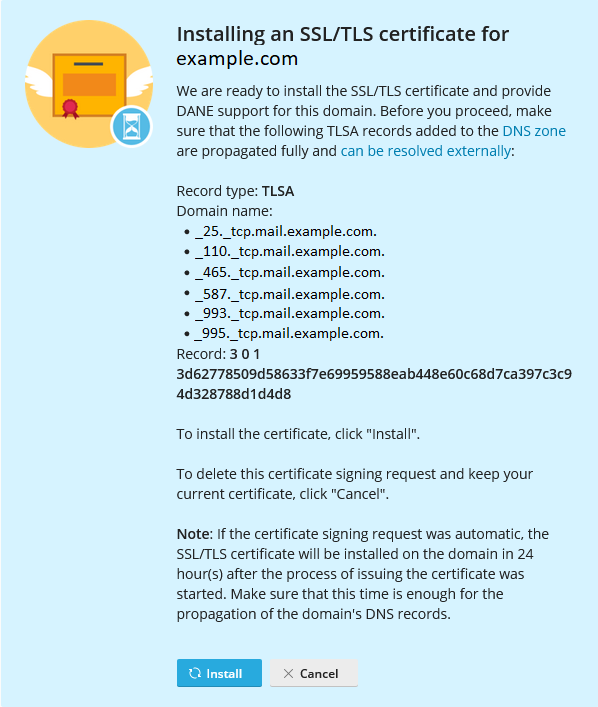
Wait a while until the created TLSA records necessary for DANE are propagated to the DNS server, and then click Install.
SSL It! has secured your domain with a Let’s Encrypt certificate and also hardened the domain’s connection to the mail server using DANE.
Automatically Renewing Certificates with DANE
SSL It! automatically renews free SSL/TLS certificates from Let’s Encrypt 30 days in advance of their expiration. If a certificate was issued with DANE support, SSL It! will configure it for a new certificate as well.
When a new certificate is ready to be installed on the domain, SSL It! creates a corresponding set of TLSA records and sets a timer for 24 hours (it is the default value). After the timer expires, the next run of the SSL It! „Keep websites secured“ task installs the new certificate and removes old TLSA records. Depending on the configured settings, Plesk also sends an email notification on the certificate renewal.
If desired, you can change the default 24-hour interval between the creation of TLSA records and the installation of a new certificate by adding lines of the following pattern to the panel.ini file:
[ext-sslit]
dane-confirmation-interval-in-hours = <the number of hours>
Zum Beispiel:
[ext-sslit]
dane-confirmation-interval-in-hours = 12
Disabling DANE Support in SSL It!
By default, DANE support is enabled in SSL It! if the Plesk server and hosted domains meet the configuration criteria necessary for DANE. It means that you and your customers can see and select the „DANE support“ checkbox under „Assign the certificate to the mail domain“ when securing a domain with a Let’s Encrypt certificate.
To safeguard your customers, you may want to disable DANE support in SSL It! by hiding the corresponding checkbox. To do so, add the following lines to the panel.ini file:
[ext-sslit]
daneEnabled = false
(Manually) Hardening Server Connections Using DANE
Sie können Verbindungen über jedes Anwendungsprotokoll, das bereits mit einem SSL/TLS-Zertifikat gesichert ist, über die entsprechende Kombination von Transportprotokoll und Port schützen (z. B. „TCP/25“ für SMTP, „TCP/443“ für HTTPS usw.).
Um Verbindungen über ein bestimmtes Anwendungsprotokoll sicherer zu machen, sind zwei Schritte erforderlich:
- Zunächst müssen Sie einen Hash für den öffentlichen Schlüssel des SSL/TLS-Zertifikats generieren. Sie können zwar auch den ungehashten öffentlichen Schlüssel oder den Hash des gesamten Zertifikats verwenden, aber in diesem Beispiel verwenden wir einen Hash des öffentlichen Schlüssels.
- Dann müssen Sie einen TLSA-DNS-Eintrag hinzufügen und eine Reihe von notwendigen Parametern, einschließlich des Hashes, angeben.
Sie müssen die Schritte oben für jedes Anwendungsprotokoll wiederholen, das Sie zusätzlich schützen möchten.
Im folgenden Beispiel werden die Schritte zum Stärken von SMTP-Verbindungen zum Mailserver für eine einzelne Domain beschrieben. Diese Schritte können auch zum Schutz anderer Verbindungen eingesetzt werden.
Voraussetzungen
Bevor Sie die Sicherheit von SMTP-Verbindungen mithilfe von DANE für eine einzelne Domain erhöhen können, sind folgende Schritte notwendig:
Sichern von SMTP-Serververbindungen
Bemerkung
Im folgenden Beispiel verwenden wir den SHA-256-Hash des öffentlichen Schlüssels des SSL/TLS-Zertifikats und nicht das gesamte Zertifikat. So müssen Sie den TLSA-Eintrag bei der Erneuerung des Zertifikats nicht aktualisieren, es sei denn, der öffentliche Schlüssel ändert sich ebenfalls.
Hashwert für den öffentlichen Schlüssel des Zertifikats erstellen
Gehen Sie zu Websites & Domains und suchen Sie die entsprechende Domain.
Klicken Sie auf SSL/TLS-Zertifikate.
Suchen Sie das Zertifikat, mit dem der Mailserver geschützt wird (mit „Schützt E-Mails“ markiert). Klicken Sie auf das Symbol
 , um das Zertifikat als
 *.pem-Datei herunterzuladen.Legen Sie die Datei mit der Endung
*.pemauf einem Linux-Rechner ab und führen Sie den folgenden Befehl aus (ändern Sie zuvor das Arbeitsverzeichnis in das Verzeichnis, in dem sich die Datei befindet, und ersetzen Sie „certificate.pem“ durch den tatsächlichen Dateinamen):openssl x509 -in certificate.pem -pubkey -noout | openssl rsa -pubin -outform der | sha256sum | awk '{print $1}'
Das Ergebnis (zum Beispiel 499e42e36d7b04529725a1f8036e0f7cf1030b4e25a3fa1988f2572e1ce70d28) ist der SHA-256-Hash, den Sie bei der Erstellung des TLSA-DNS-Eintrags verwenden.
TLSA-DNS-Eintrag hinzufügen
- Melden Sie sich in Plesk an.
- Gehen Sie zu Websites & Domains und suchen Sie die entsprechende Domain.
- Gehen Sie zum Tab Hosting & DNS und klicken Sie auf DNS.
- Klicken Sie auf Eintrag hinzufügen.
- Wählen Sie „TLSA“ im Drop-down-Menü „Eintragstyp“ aus.
- (Optional) Geben Sie eine TTL für den Eintrag an. Wenn Sie sich nicht sicher sind, was die optimale TTL ist, lassen Sie das Feld „TTL“ leer. In diesem Fall wird der Standardwert verwendet.
- Geben Sie den Port „25“ an. Verwenden Sie keinen Unterstrich. Er wird automatisch hinzugefügt.
- Geben Sie als Protokoll „tcp“ an. Verwenden Sie keinen Unterstrich. Er wird automatisch hinzugefügt.
- Geben Sie „mail“ in das Feld „Domainname“ ein.
- Wählen Sie „3, DANE-EE“ im Drop-down-Menü „Verwendung“ aus.
- Wählen Sie „1, SPKI“ im Drop-down-Menü „Selektor“ aus.
- Wählen Sie „1, SHA-256“ im Drop-down-Menü „Zuordnungsart“ aus.
- Fügen Sie den zuvor erstellten Hash für den öffentlichen Schlüssel des Zertifikats in das Feld „Daten der Zertifikatszuordnung“ ein.
- Klicken Sie auf OK und dann auf Aktualisieren, um die Änderungen der DNS-Zone zu übernehmen.
Ein TLSA-DNS-Eintrag wird hinzugefügt und die Änderungen der DNS-Zone werden angewendet. Sobald die DNS-Änderungen übernommen wurden (dies dauert in der Regel etwa 24 Stunden), ist DANE für SMTP-Verbindungen zur Domain aktiv.

